Everyone has different techniques when it comes to genealogical research. My techniques have ranged from setting aside regular time to research to nonexistent (especially after having a baby). Most genealogists utilize a combination of methods to delve into their family history. I’m not referring to using the internet or tracking down certain records, but how we actually decide to go about our research with regard to the family tree itself. Here are three different approaches to get you started:
One Branch at a Time
This is probably where you will begin as you build your family tree. Roughly four times a year, I revisit this technique of climbing my entire family tree, from me, up through each and every single ancestor. It leads me to “brick wall ancestors,” to whom I must devote extra time and energy, and to other loose ends.
Tying up Loose Ends
These are the people who just need the smallest amount of research to verify dates and places. Usually I find them in my immigrant ancestors in the 1600’s. Then there is the ongoing battle, the never-ending endeavor of…
Tackling the Brick Wall
I think all of us have to do this with a handful of ancestors, if not more. When it comes to these ancestors, it feels like they were dropped on the planet with nothing but a name! They might have come from an obscure childhood or traveled from one country or state to another, but no one seems to know their actual place of origin. We focus on our brick wall ancestors and sometimes devote hours, days, weeks, even months and years to them.
I have a few, most of whom are immigrant ancestors. When I work specifically on them, they are the sole focus of my research. However, I always take a break, so I can come back with fresh eyes a few times a year.
Occasionally, I also like to go through every name in my genealogy software. That’s a huge task, because I have over 12,000 names (which is conservative compared to many other genealogists!). However, doing this once a year allows me to find people I’ve forgotten and review what might be missing from their profile. That’s manageable with 12,000 people, but I imagine it wouldn’t be after a point.
Figuring out your process (or processes) of going through your family tree may take time, but there is no wrong way to do it.
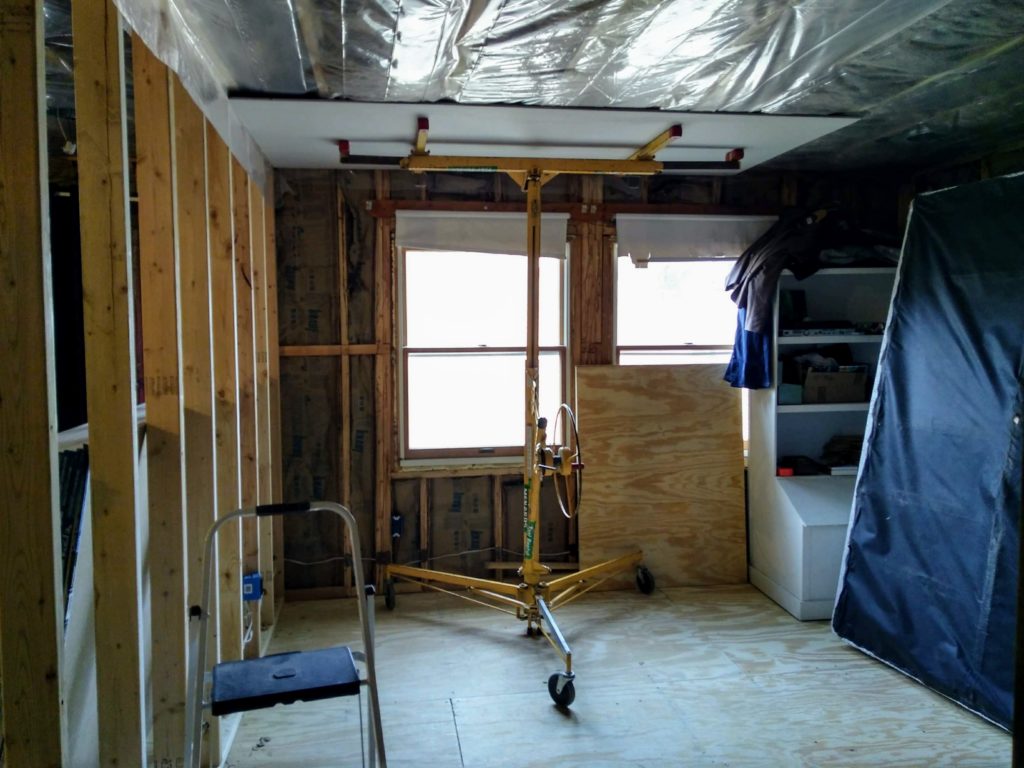
With the first two bedrooms gutted, we started the process of renovating them. First, we installed new wiring and recessed lighting cans. After the county inspector gave the electrical work the green light (which is easy to get when you do it right), we added modern insulation for both the ceiling and walls. Finally, we hung the plastic that holds the ceiling insulation in place. One thing I forgot to mention in part 1 is that my husband also goes through the process of strengthening all the ceiling joists. It’s a lot of work, but lifts and reinforces a previously sagging ceiling.
Ceiling drywall goes up next! That’s exciting, because it signals the next phase of the renovation – turning what looks like a construction site into an actual room.
Covering the insulation is one of my favorite moments of this entire process. It takes a few days to get all the drywall up on the ceiling and wall studs. Once it’s on there, we get into the process of taping, mudding and sanding. This is where the excitement fades, because drywall dust is insidious stuff. It gets everywhere and it never seems to end!
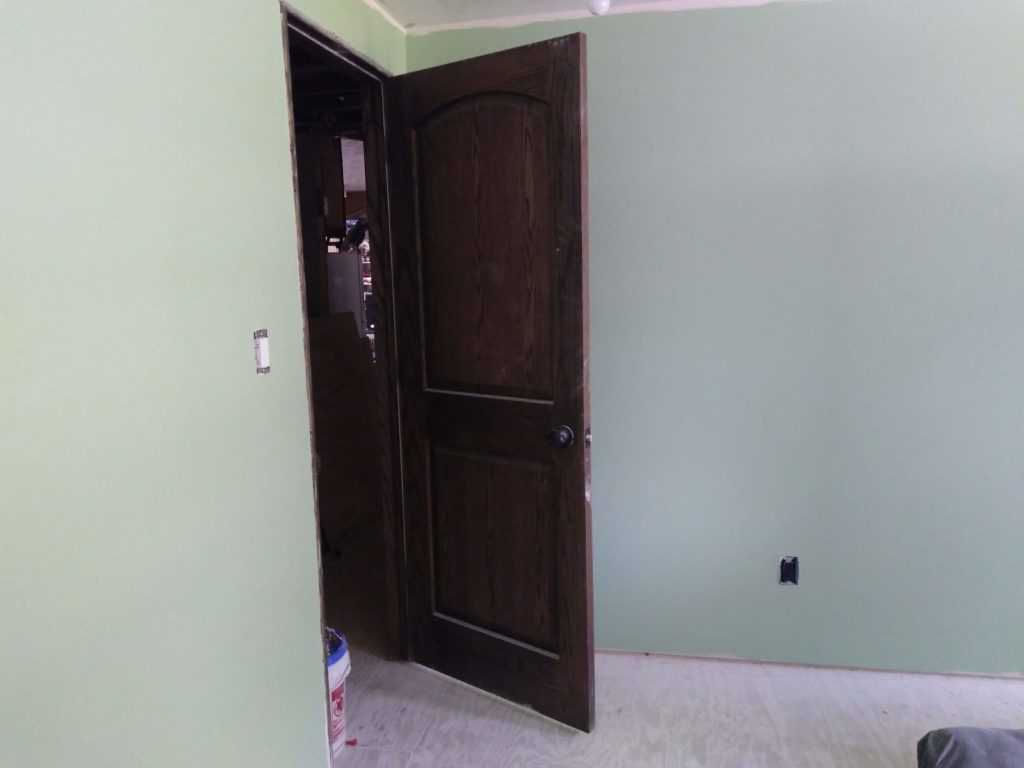
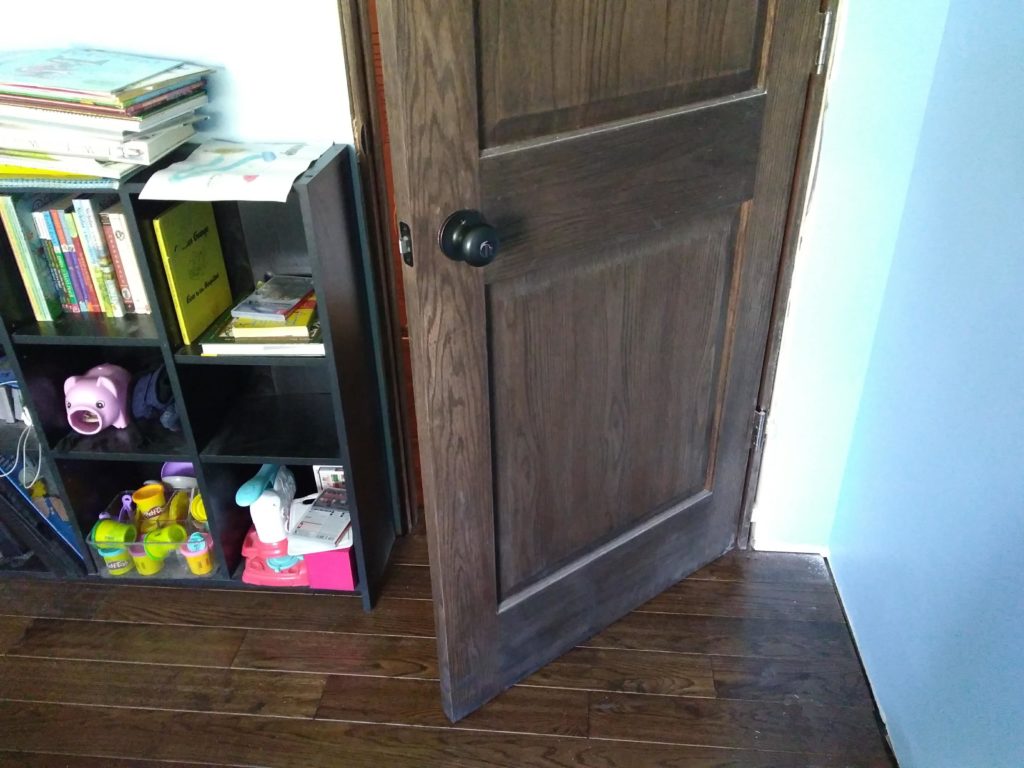
When that messy part was done, we installed new doors on each bedroom. The old layout had the doors facing each other. Those doors were as thin as the walls. You could easily put a fist through them.
We replaced the hollow core doors with solid core oak doors and stained them dark. Hanging the doors was a frustrating process, but once it was done, we were ready to paint! Our room got a pale green color called “Lime Taffy.” Paired with the door and dark brown curtains, it looks like a bowl of mint chocolate chip ice cream.
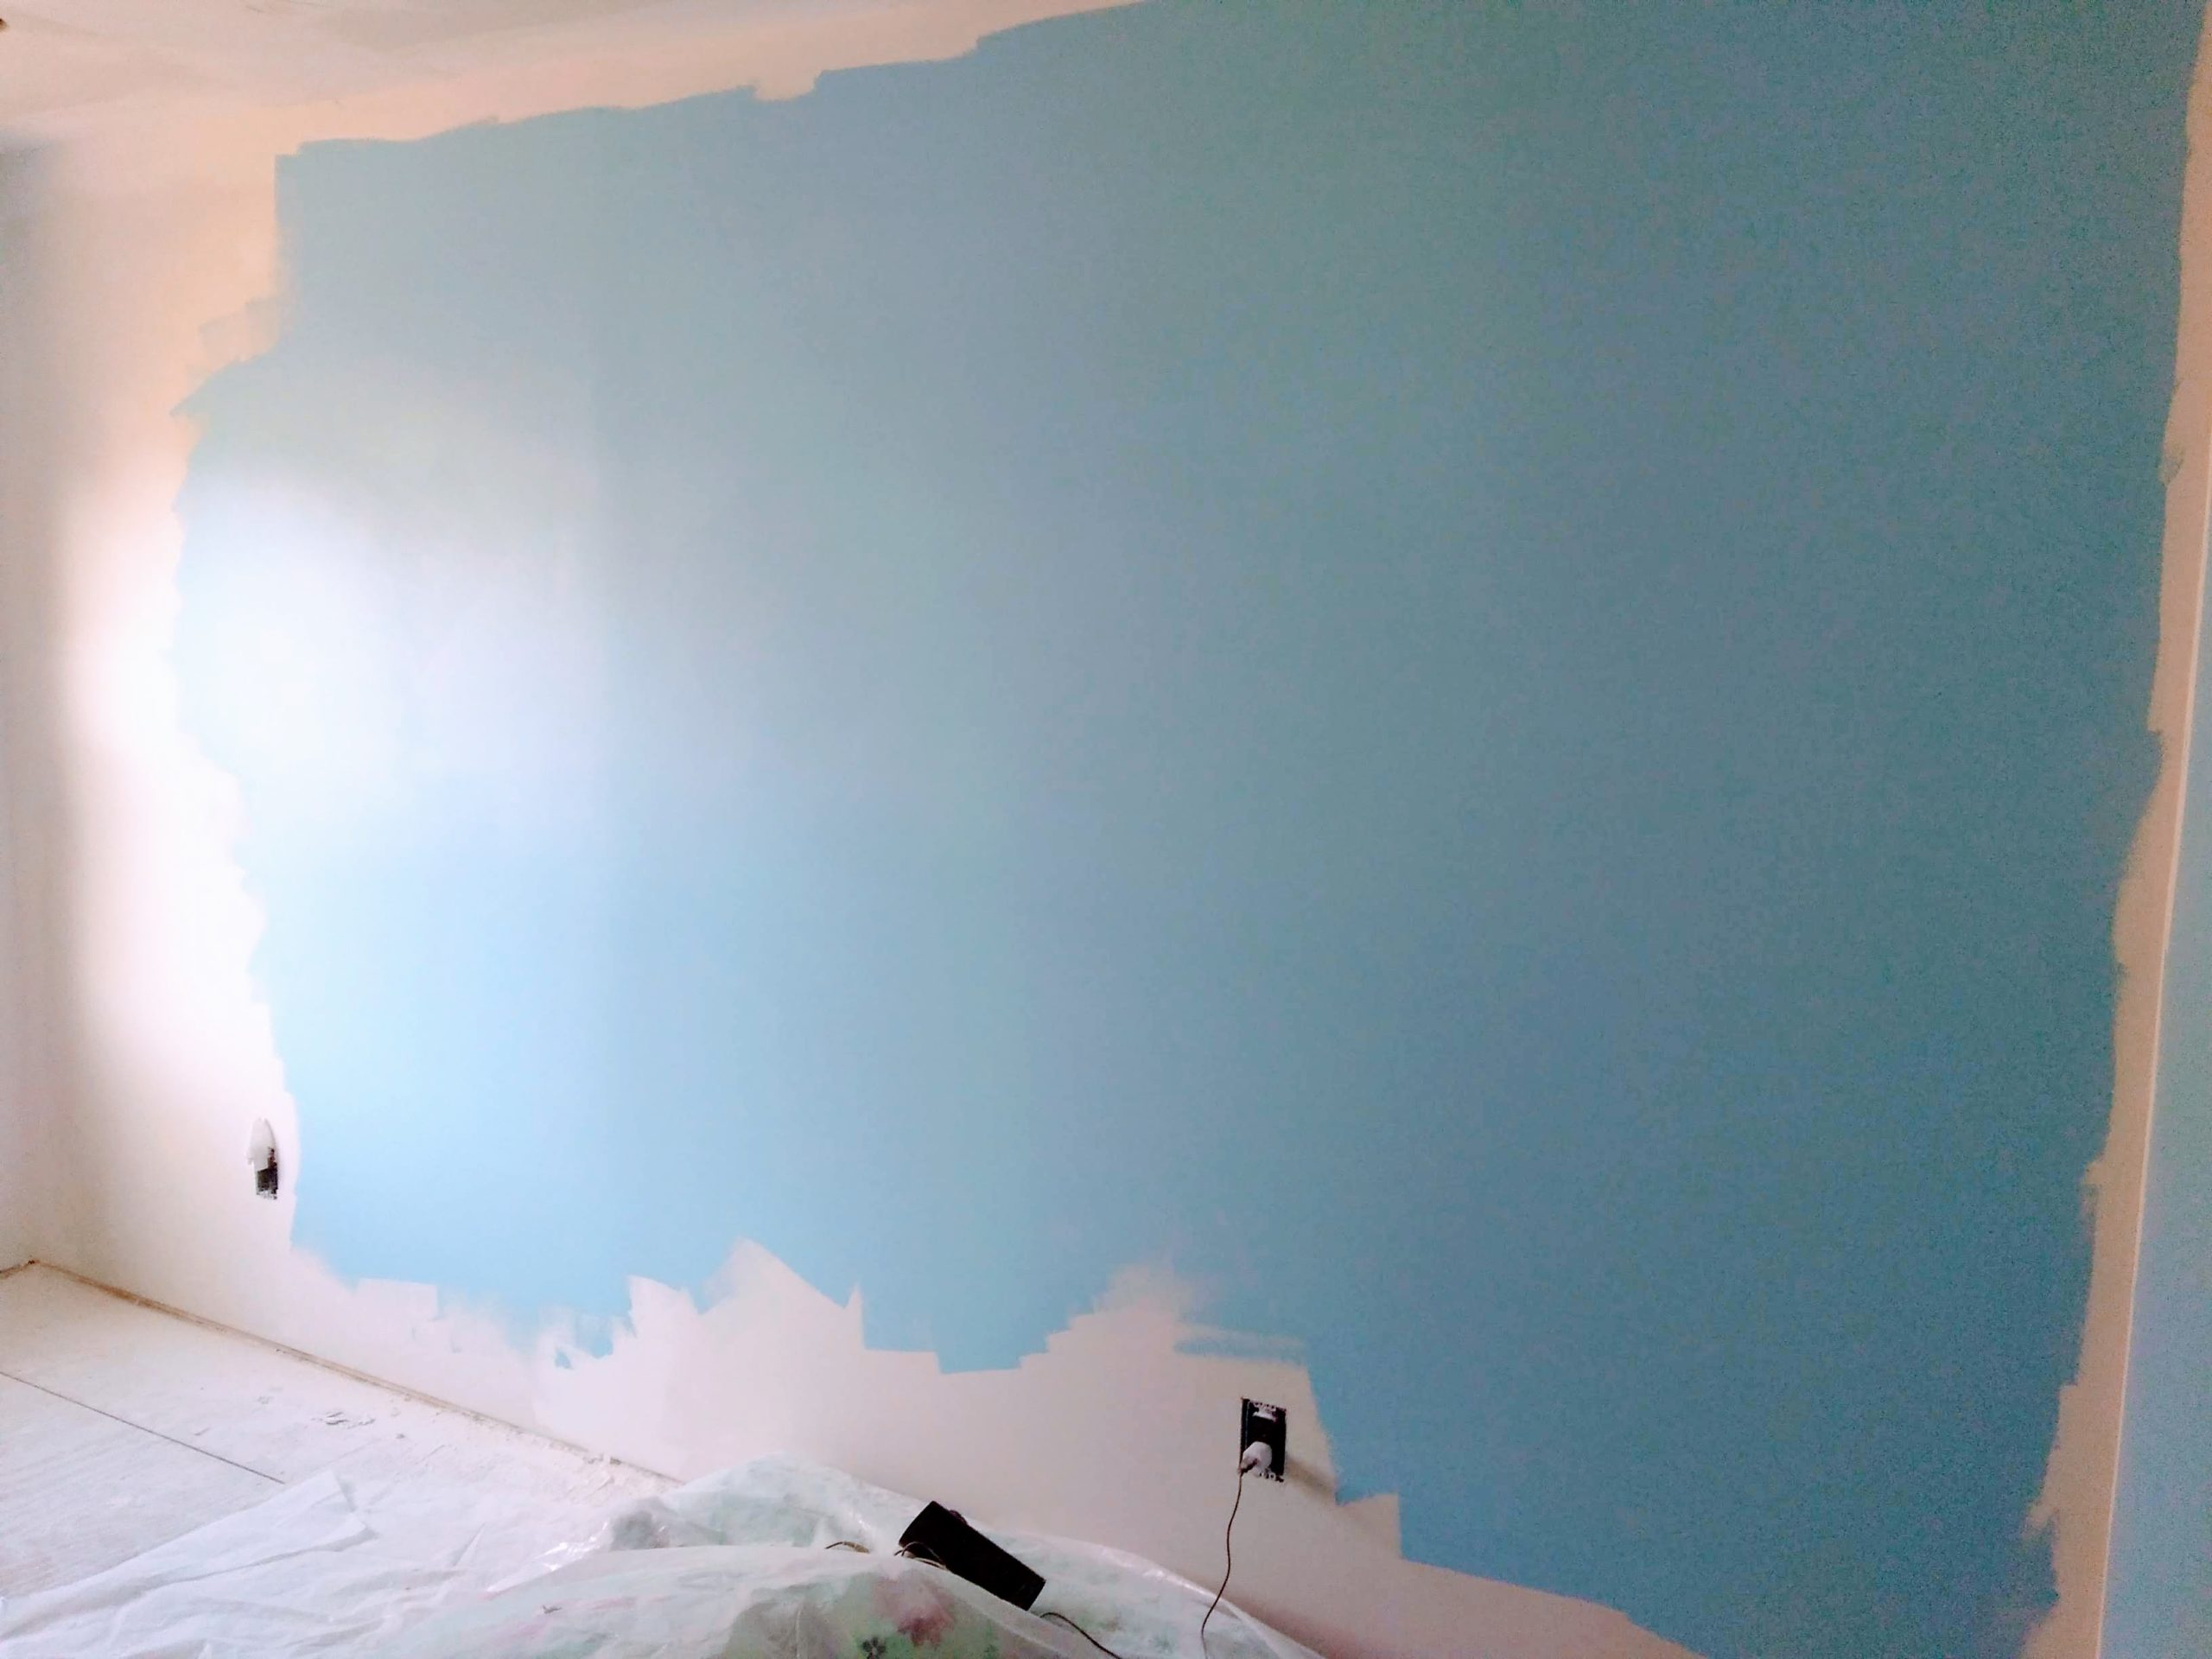
Our daughter’s room got a sky blue called “Windsor Way” at her request. The original picture makes it look a little more Robin’s egg, but it’s much softer and less green than the lighting appears to show.
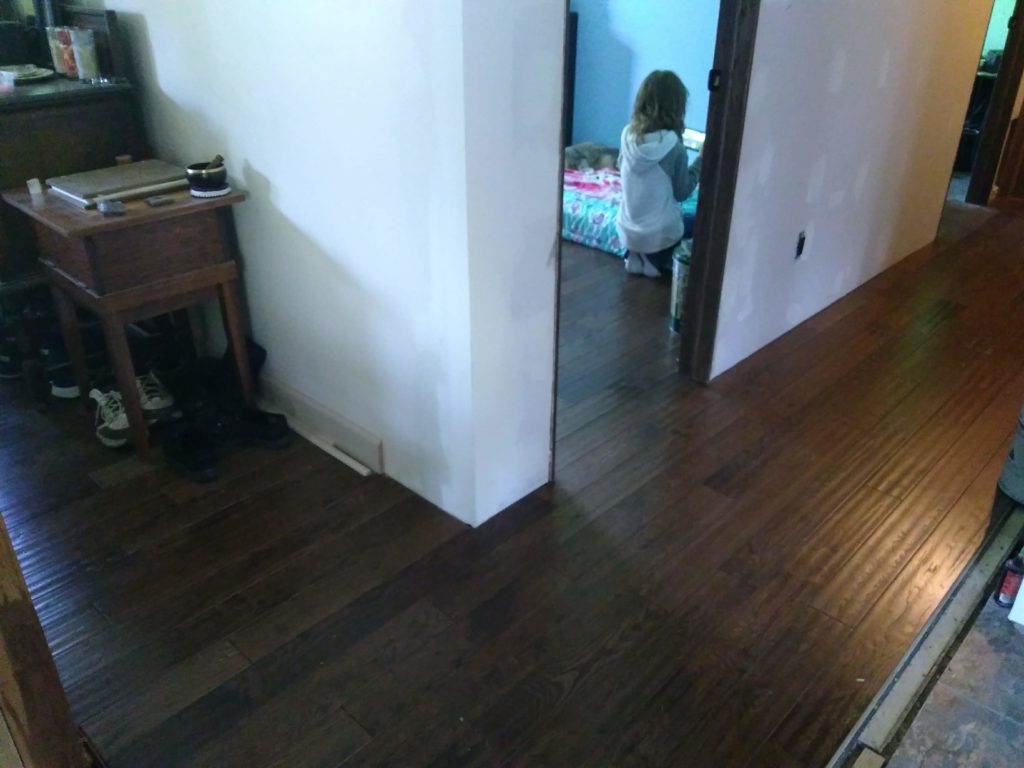
Once the rooms were painted, it was time for flooring. This was an adventure. The flooring we chose for our living room – “Smokey Topaz” made by Great Lakes Wood Floors – was discontinued. Our local Menards didn’t have any and they don’t place orders to for inventory from other stores. We looked at our options and decided to buy out all 26 boxes available at the nearest store… in Sioux Falls, South Dakota.
This took into consideration the leftover flooring we had in our home from doing our living room, the need for 20 boxes to do both bedrooms and the hall, plus the eventual need for more flooring to do the third bedroom.
Neither of us was excited about the idea of a 7-hour round trip to haul a truck full of flooring, but that’s what we did. It turned out to be the best decision for a number of reasons, both practical and personal. After a triumphant road trip, we let the flooring sit in the house for a few days to acclimate and then it was time to install it.
Once we completed the hall and first two bedrooms, and went into the third bedroom, we found we had enough to complete that one, as well. We aren’t doing the third bedroom yet, but it’s good to know we have enough flooring to finish the house.
The discontinued flooring led to the question of what we would do with the dining room floors. That was easy to determine. The dining room will get the same flooring as the kitchen, whatever we choose. That flooring will also go into the addition, since it will function as a partial mudroom and laundry room.
With the flooring in place, we had paint touch-ups, trim, outlet and switchplate covers, and other random bits to do! We also replaced the in-floor heating/cooling vents with the ones that go against the wall, instead. First of all, it looks nicer. Second, it’s more practical. We’re less likely to drop small things, like tiny Legos, down an angled vent than a floor one! The finishing bits should be done by the end of May and we are so glad this part of the renovation is nearly complete.
Besides final photos to come, what’s next? We have to wait about 3 years for the next phase in our renovation process, because it’s the addition. We need to save money. We don’t want to start the addition and do it in pieces. Leaving it uncovered (no roof, no housewrap, etc.) and open to the elements is an awful idea.
The addition will replace the back deck. It will include a storm cellar, since we don’t have a basement. The room will function as my office, as well as have a separate laundry room and mudroom/entry. I’m excited about this, because we will also update the exterior of the house in this phase.
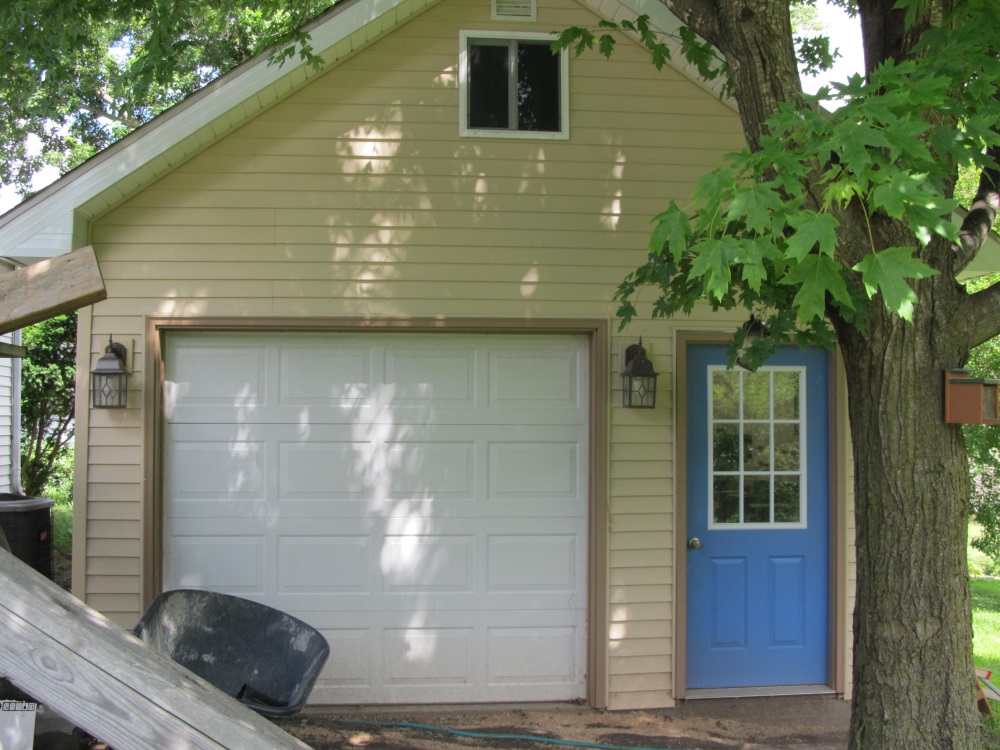
Our house only has studs, a layer of old siding, and a layer of new siding on top. No plywood and no housewrap between the studs and siding! Fixing that and replacing the grungy white siding with the wheat color used on the workshop is going to be fun. I love installing siding. It’s like putting together a puzzle. Modernizing the exterior with plywood and housewrap will also make the house that much more energy efficient.
The workshop siding – looking forward to the house exterior matching it!
After that, we’re left with the most expensive parts to tackle: the bathroom and third bedroom at the same time, which includes the water heater and furnace, and then the kitchen and dining room. Moving the washer and dryer from the bathroom into their own dedicated laundry space will allow us to enlarge the bathroom, while the kitchen will get a complete overhaul with added cabinets, an island, and a breakfast bar.
With the cost of doing the other half of the house, we should be done… oh, in another 20 years or so. >.< But at least we’ll have a house we like and it will be much more attractive and modern, and easier to sell someday!
I work with someone who asks me a LOT of questions about genealogy – how do I figure out this or that, how do I know how closely DNA matches are connected, and where do I find answers to particular questions? So I thought it might be a good time for a good old-fashioned “how to” post on the first steps to take if you would like to research your genealogy.
Here’s a little caveat: Genealogy is not just addictive, but contagious. The two questions people ask me most often are “Will you help me find…?” and “How do I start working on my own genealogy?” Once you start, your friends and family might want to get in on the fun.
First, I will give you the most essential piece of advice: write it down. All of it. This applies to everything you will do and everything you will encounter. Write it down. One day, you might ask yourself, “Wait – where did I get the information that great-great-grandpa smoked imported stogies and worked as a stone mason?” By writing down the publication or conversation with a family member, you’ll have your source. For example, this particular tidbit comes from the family history my great-great-aunt Espezzia dictated in 1991 with two of her sisters, including my Nana (great-grandmother).
Step 1: Gather Information
Your initial step should be to write down everything you already know about your family. Who is related to whom? Do you know where and when your parents were born? What about your grandparents and great-grandparents? Do you know where and when they died or were married?
Write down every single bit of knowledge you have on your family, even if it’s a note such as “Aunt Mary said Great-Grandma ran a dry goods store.” Your Aunt Mary might not remember the name of the store and she might give you a vague location, saying, “It was in Boston or Cambridge or somewhere around there…” But write it down nonetheless.
Step 2: Talk to Your Family
The next thing I urge people to do when they come to me for advice about how to research their family tree, is talk to family members. Begin visiting with or contacting those family members you are closest to, and start asking them questions. Keep in mind that parents or grandparents can forget things sometimes, which leaves us with more questions than answers. But that’s all right! Treat every tidbit of information as a clue. For now, you are gathering all the information you can. Verifying and building on it will come later.
In particular, I encourage you to speak to your parents, grandparents, aunts, uncles, great-aunts, great-uncles, and cousins, especially older cousins in the same generations as your parents and grandparents. Don’t leave out anyone, unless you think they might treat your queries with hostility. I know my Nana’s (grandmother’s; yes, we call both of them Nana) first cousins have shared some very interesting information that my Nana or others did not recall, or share with me.
These older generations are precious. You may learn everything you need to know from one person, or you might get conflicting information from a few people that can help you narrow down some of your questions. I’ve had plenty of people come to me with family information that was incorrect, and that’s perfectly fine! The point of compiling this initial information is to confirm it, if possible.
To this day, I am most grateful to my great-great aunt, Espezzia, who took the time to share her story on tape and paper. The document everyone in our family now has is full of recollections by my great-grandmother and two of her sisters of their parents, grandparents, siblings, aunts, and uncles, and their lives during their childhood. The sisters who worked on the family history were all nearly 90-years-old at the time, and the document itself is invaluable to their descendants.
Why did they do this? Had someone thought to ask Espezzia, her sisters, and brothers about their childhoods or their parents’ lives in Italy? I don’t know, but I’m so glad these women took the initiative to put their thoughts on paper for future generations.
Likewise, I’ve “interviewed” my Nana, my grandfather, my grandmother, cousins of theirs, my second cousins, an aunt, and my father. Genealogy is not just about adding names, dates, and places to a family tree. It’s akin to stepping back in time and putting yourself in your ancestors’ shoes. Talk to the older generations in your family now – don’t let the chance pass you by!
Step 3: Organizing the Information
Now that you’ve written down what you know about your family, and what they know, and what the people they know know… You get the idea. You should now have pages of notes. Perhaps it’s a single piece of lined paper with incomplete names and dates, and guesses as to places. Or maybe you have a smattering of emails from different relatives.
Paper genealogy is still where I feel most comfortable when it comes to collecting and organizing information. It makes life simpler to pull out a binder of charts or vital records for an “at a glance” look at things. Never underestimate the power of the basics. Most of us start out with these. I don’t know if any genealogists ever really phase them out of their work, even with all that family history software can do for us!
Now you need forms to organize your information into easy to read formats. You can Google the following forms and find PDF templates. I’m partial to the free forms available from Family Tree Magazine’s website at www.FamilyTreeMagazine.com. You are looking for the following forms:
Five-Generation Ancestor Chart aka Pedigree Chart
Family Group Sheet
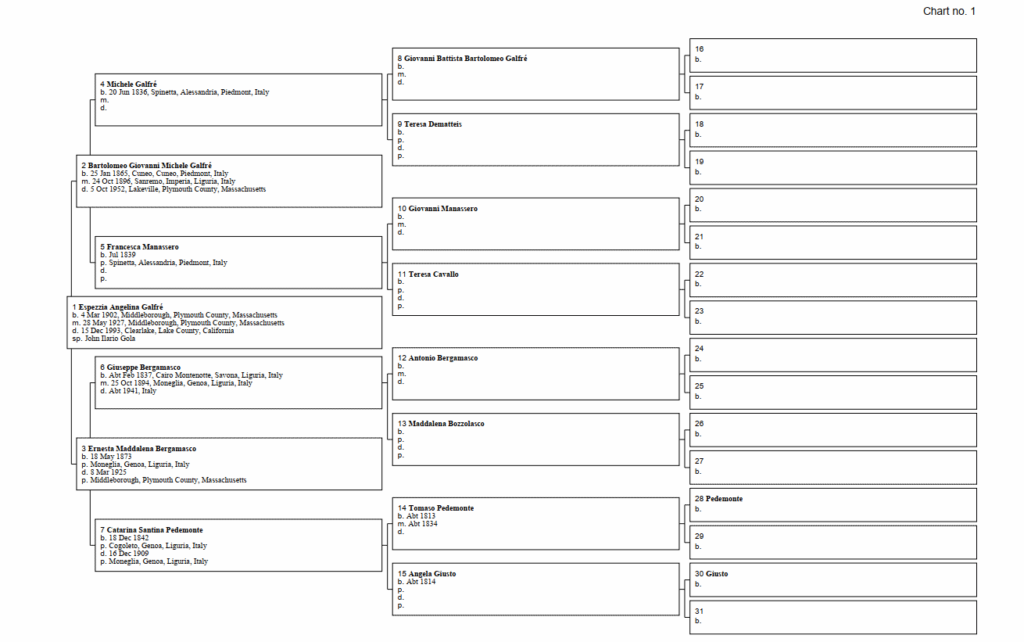
The five-generation ancestor chart is your most basic form and probably similar to what you might envision when you think of what a family tree looks like. It lays out your ancestors starting with you as number one. Use yourself as the starting point on chart number one by filling in your name on the very first line on the chart. Your parents will be next, and then their parents, and so forth. The standard practice is to list the men on the top line and the women on the line below them.
These charts allow you to go back a few generations, recording names and dates and places of birth, marriage, and death. It doesn’t go in depth about the people’s lives. Instead, it gives an overview of yourself or the ancestor listed on the first line, parents, grandparents, and so on.
This chart will give you an at-a-glance view of your ancestry and make it easy to see the areas where more information is needed. I recommend filling in any uncertain information with pencil first. You can always erase it and use pen later when you confirm a name, date, or place.
When you get to the fifth generation, it’s time to begin a new chart starting with the last people on those sixteen lines on the right side of the page. You will assign each of those people a chart number, and then begin a new chart, i.e. chart 2 will start with person 17 on chart 1, chart 3 will start with person 18 on chart 1, and so on. Your chart will look something like this:
Pedigree Chart showing the ancestors of my great-great-aunt Espezzia.
Don’t worry if there are blanks in the chart. The point of genealogy is to fill those blanks and learn more about these people who – at this point – are probably just names and numbers to you. Soon you will know that Great-Grandpa Benjamin wasn’t just some man born January 1, 1900 in Dayton, Ohio. If you play your cards right, you’ll also learn he was a shoemaker with a penchant for wearing the same overalls every day and smoking a pipe, which his second wife absolutely despised but put up with anyway because she loved him so much.
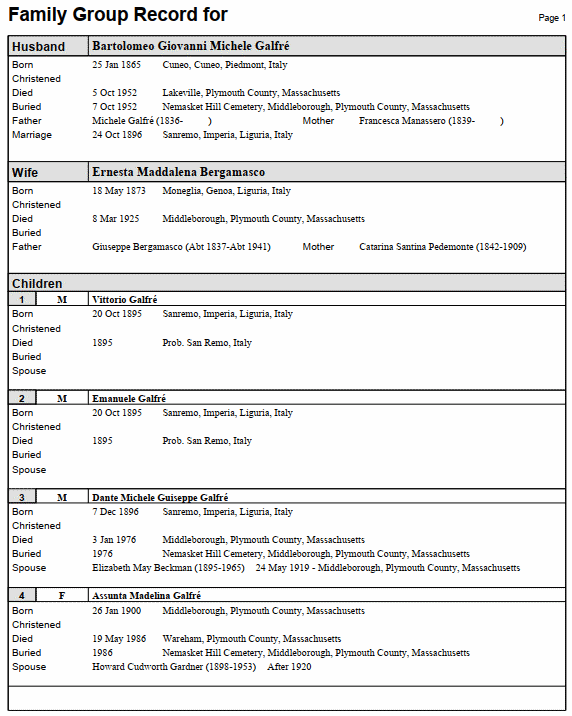
You’ll notice, however, there’s no room to add such commentary to the five-generation ancestor chart. In fact, this form is only meant for direct ancestors, not collateral relatives. So it’s time to make use of the Family Group Sheet.
As you will see, this form has room to record much more information. Specifically, this allows you to write the names of a couple, their dates of life events (birth, marriage, and death), the names of their parents, and the names and life events of the couples’ children. Once completed, you will end up with something like this:
Family Group Sheet (page 1 of 3) showing my great-great grandparents and the first 4 of their 8 children.
This form allows you to expand on the information about a particular couple and their children, which is especially useful if you need to employ advanced research tactics such as sideways searching aka “the FAN Club” (something I will try to post about one of these days).
A couple other forms you may want to have on hand are:
Correspondence Log – handy for tracking emails and letters you write in your search for information.
Research Worksheet or Journal – useful for tracking the sources you’ve already checked for a specific ancestor
Research Calendar – a good way to track the dates of visits you’ve made to various locations for your research
Research Checklist – a comprehensive listing of resources that you can check off as you view them for a specific ancestor
These forms are also available at Family Tree Magazine’s website or via a Google search.
This is the first step to organizing your information and research efforts into a logical format. However, don’t throw out your initial notes, particularly if there were questionable names, dates, and places! Either save or scan your notes. If they are handwritten, you may choose to transcribe them and print a copy.
I will try to post about genealogy software available and digitizing all of this. But I suggest keeping everything you’ve gathered together in one place, even if you ultimately scan and digitize it in some way. You may find that everything fits in a large manila envelope or folder at this point if you’re just starting. Don’t worry – when it’s time to outgrow that initial storage, there are many different systems for organizing your information.
Step 4: The Fun Stuff – Research!
Armed with knowledge and ready to learn more, you click to open your internet browser, and type the word “genealogy” in a search engine. Various results pop up and you select the most popular of them all – a behemoth of a genealogy site you’ve seen advertising during episodes of “Who Do You Think You Are” that, for a price, will give you access to everything you could ever want – censuses, vital records, books, and more!
Hold it right there. Back away from the keyboard.
As eager as you are to begin your journey, let’s talk about genealogy as a big business. There are the sites that offer a complete history of your surname, along with a lovely coat of arms to display on your wall. I hope by now, most people have learned those sites are nothing but public information brokers, and won’t give you anything of value.
Then there are the sites that do offer legitimate information for a subscription. I’m here to say put the credit card down and take a look at these gems before paying big bucks for access to genealogical records:
These are the initial sites to which I refer new researchers because they’re free and offer a wealth of information. I also like to suggest going to the state or regional genealogical society pertinent to your family history (for me, it’s the New England Historic Genealogical Society) and seeing what they have available if you become a member.
That’s not to say you won’t get good value for your dollar with any of the subscription sites. However, you will find censuses, vital records, military records, immigration records, and more at FamilySearch. And, if you are so inclined, you can give back as a volunteer in the future by transcribing records for them.
Finally, a warning: don’t copy every family tree you see online. It’s tempting, sure, but treat those family trees as hints and then verify information before adding it to your own!
Of course, there is so much more to learn about genealogy. These are just simple first steps to get anyone started tracing their genealogy or learning about their family history. As you go forward from here, there are many different directions and layers to this endeavor, and a different path for everyone. 🙂
It’s almost done! O frabjous day! With so much awful front-page news – which is how it should be, and I hope all of you are well – it feels good to find happiness in one’s own nest.
As always, here’s a summary of how we got from there to here: my husband’s Air Force enlistment ended in 2013. We moved back to the United States and purchased a super cheap house with the intention of taking it from musty to modern. The first task was to build a workshop to house tools and provide a space to work. The second task was to renovate our living room. Both the workshop and the living room are here.
The front two bedrooms and hallway came next. We’d already ripped out the carpeting in the hall and first bedroom, which left us with only subfloor for a few years. Needless to say, we’ve all suffered our share of foot splinters. Last week, however, the hardwood floors went in and we’re enjoying the fresh, new, splinter-free texture beneath our feet!
So let’s dial it back to the beginning. With the living room complete as of Spring of 2019, we started on the bedrooms in the fall. WHY do we always gut a room right before it gets cold, and then have to block the uninsulated portion of our house off with heavy-duty plastic? I don’t know, but apparently that’s just how we roll.
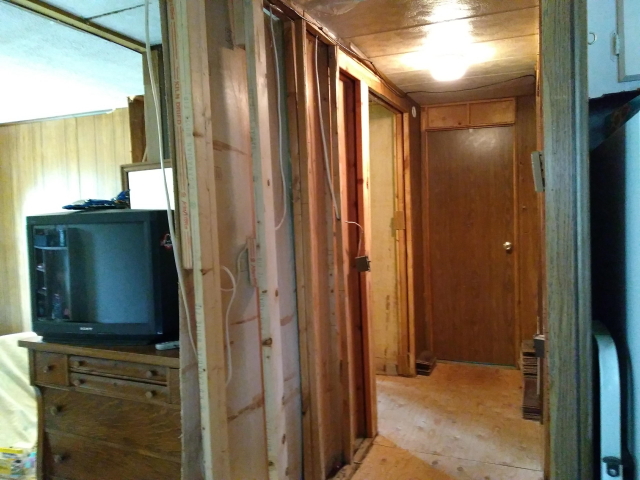
Here are the “before” pictures. The first bedroom was already partially done (we’d already hung drywall on one wall of it) and partially destroyed (carpeting gone, subfloor visible) at the same time. This picture was taken through where the wall used to be.
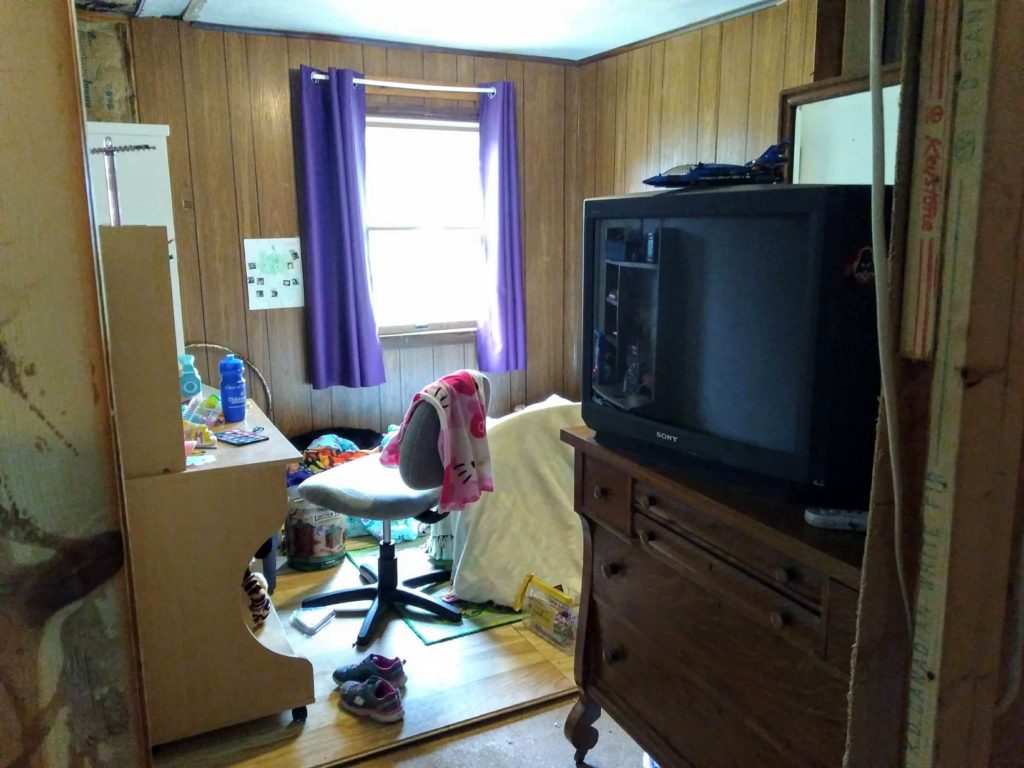
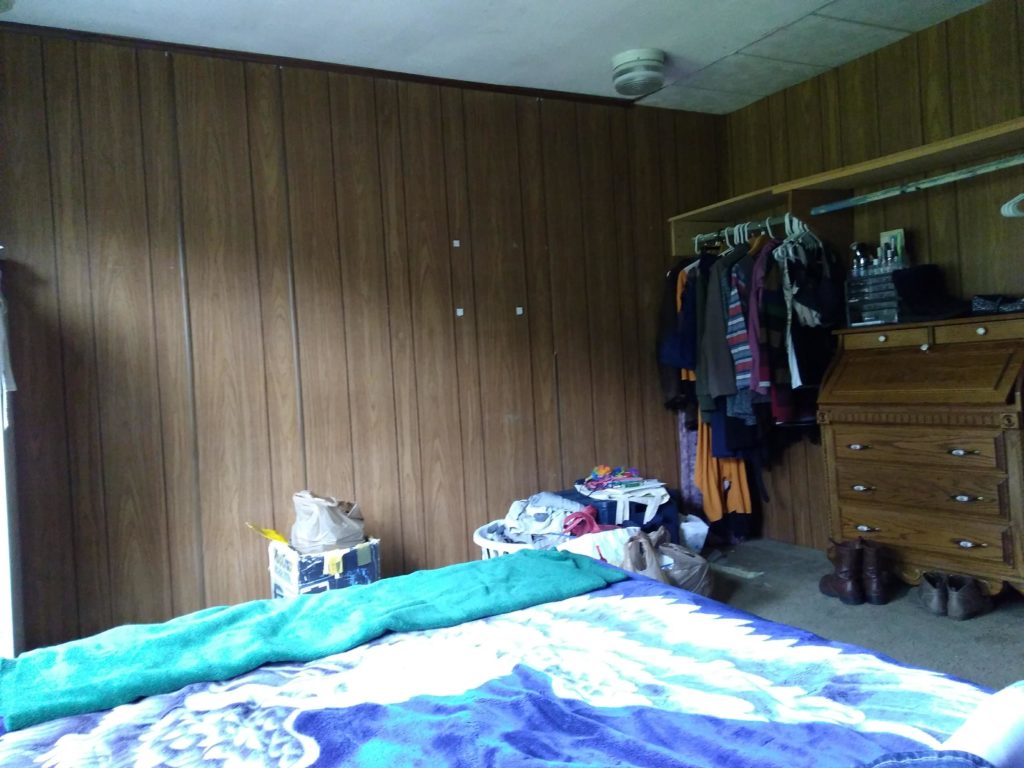
The other bedroom is the master bedroom and this is what we started out with.
Fancy, aren’t they? Why would we want to renovate any of this? This is after my husband removed the edges of the so-called closet. Let the gutting begin!
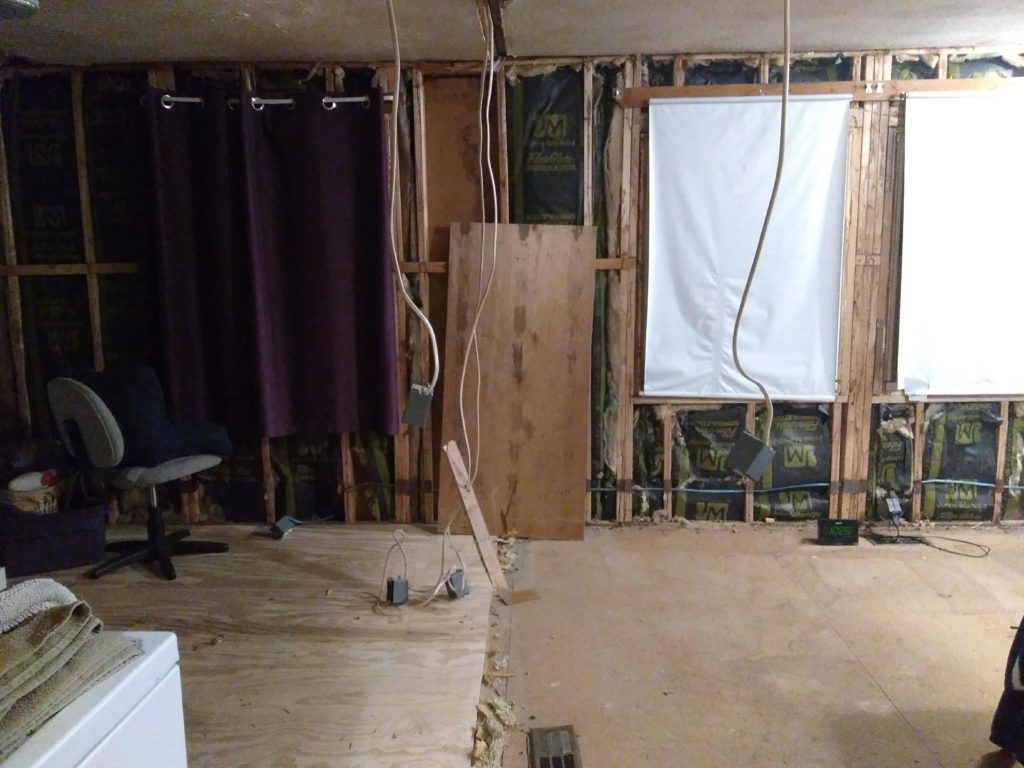
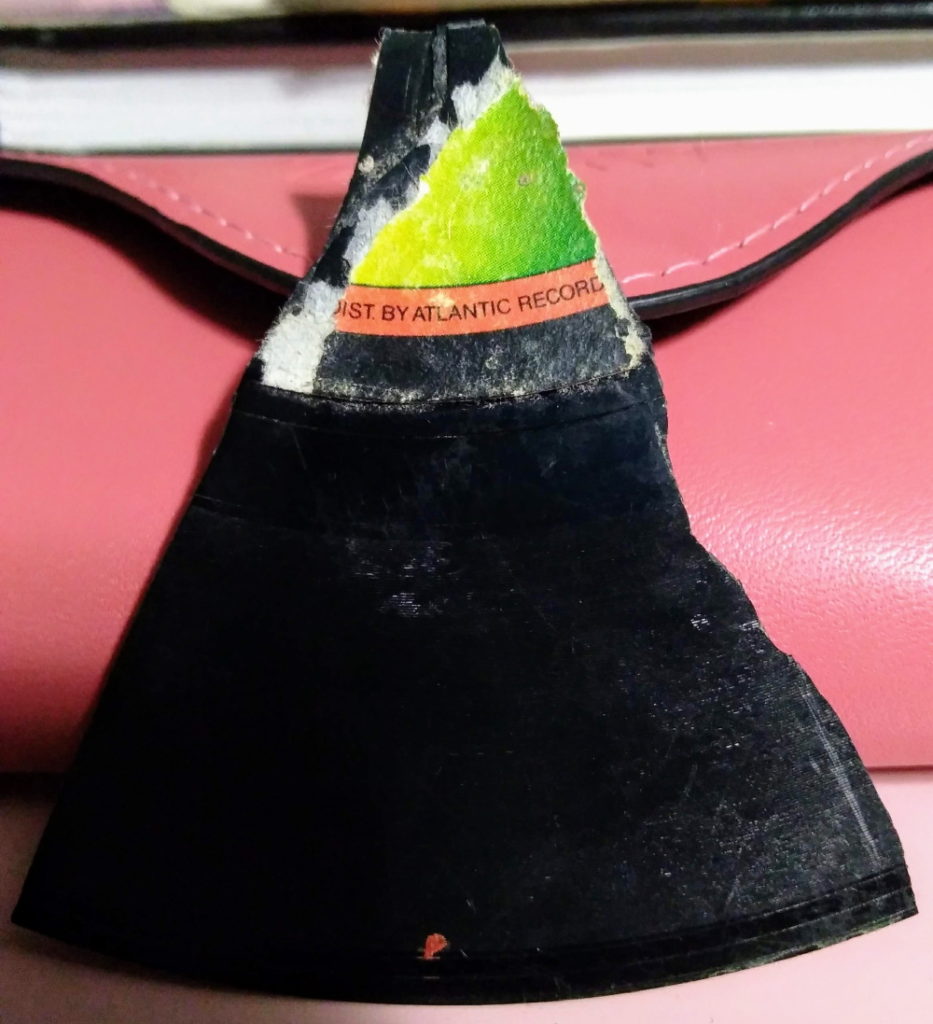
We rented a dumpster, and started by ripping out the wall separating the rooms. Then we ripped out the ceilings. Check out our vintage insulation! It goes back to 1977. So does this piece of a 45 we found inside one of the walls.
“Undercover Angel” by Alan O’Day, 1977.
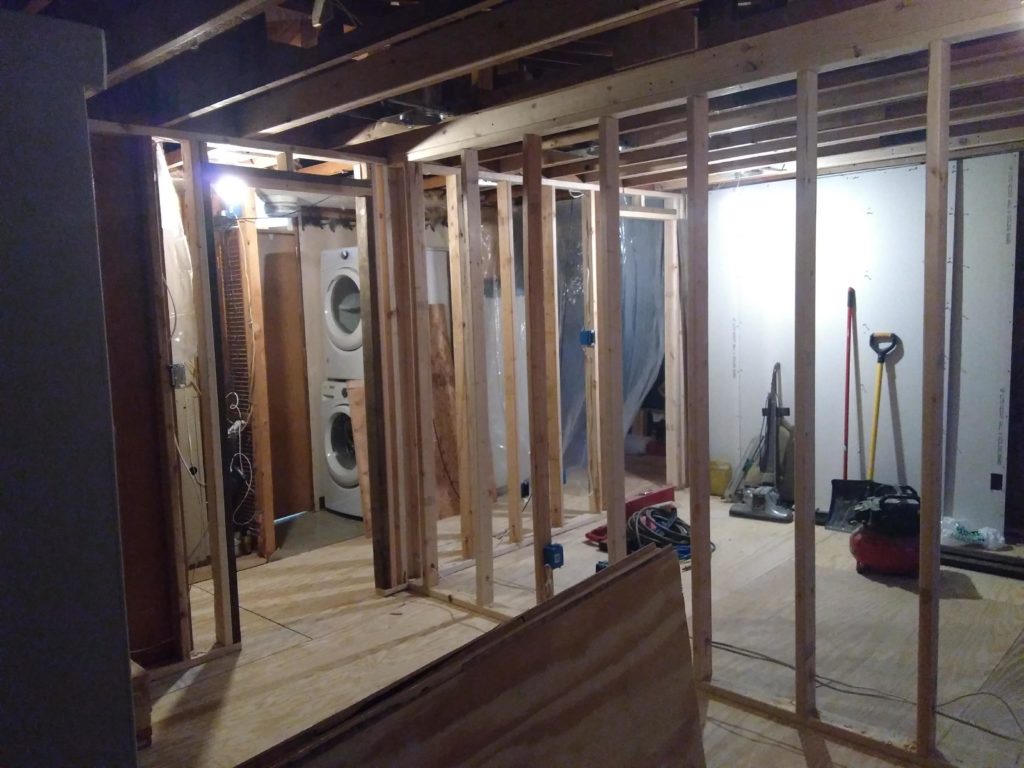
Once we pulled out the insulation and the old wiring, we were in business. My husband added new framing between the bedrooms. In doing so, he also changed the layout. Originally, there was an alcove for a dryer that jutted into the first bedroom, and then the bedroom doors faced each other. We purchased a stackable washer/dryer set, with the intention of making this change. The new layout places both bedrooms’ doors in the hall proper, adding more square footage to each bedroom.
The drywall you see here was added when we put drywall in our living room, a few years prior.
He then installed new wiring and recessed lighting cans. The first bedroom had a single ceiling fixture. The master bedroom had two. Both were pretty darn outdated, as you can see from the photo of the master bedroom before we gutted it. Then, we added modern insulation for both the ceiling (unfaced R30) and walls (faced R13). It’s amazing what a difference bringing the insulation up to today’s standards makes.
Many people ask just how far we go when renovating a room. We go all the way – gutting it from the ceiling joists to the studs to the subfloor. Each step takes varying amounts of time depending on the money we have available to move forward and how time-intensive a particular aspect is.
Once all of that work is done, the fun can really begin… in part 2!
I'm just a college-town New Englander living in small town Nebraska. I'm also a Hedge Witch, writer, genealogist, gamer, cross-stitcher, feminist, poly/pan, and wielder of rainbow d20s.